
This has nothing to do with Moonroom Recording, per se, but I thought that it was relevant to recording in general and American's Constitutional Rights specifically.
It is hard to believe that this is actually going on - a man arrested and looking at up to 75 years in prison, because he recorded the police (once known as "public servants") without their consent.
I don't mean to get all POLITICAL (this blog is not the place for that), but hopefully this case gets THROWN OUT before it ever gets to court!
Thursday, September 1, 2011

Wednesday, March 23, 2011
CAD MH310 / Superlux HD-662F Review

There is almost no info available about the new CAD MH310 headphones right now - but I just got three pair today.
Here's the available spiel on the CAD cans:
**********
"CAD MH310 Closed-Back Studio Headphones Details
The CAD MH310 is a closed back, circumaural, precision built monitor headphone equipped with 50mm neodymium drivers offering extended frequency response while delivering exceptional detail and clarity. Exceptionally comfortable, the MH310s are designed with a self-adjusting headband with closed-back leatherette ear cushions that allow for hours of comfortable, fatigue free listening.
CAD MH310 Closed-Back Studio Headphones Features
* Frequency response: 10Hz-30kHz
* Sensitivity: 98 +/- 3dB
* High output, Neodymium 50mm drivers
* 2.5 Meter (98”) cord with 1/4" and 1/8" plugs
* Impedence: 30 ohms
* Foam cushions for maximum comfort and sound isolation
* Carrying pouch
* One year Limited Warranty"
**********
So, with just about zero information anywhere online on these, I had to start searching for some super-similar styles with the same specs (use that line to test for sibilance the next time you set up a vocal mic).
The closest I came up with was the brand-new Superlux HD-662F. Superlux is the new up-and-comer big-bang-for-the-buck headphone brand made in Taiwan. "Close" isn't even the word for the match I got - except for the branding, the CAD and Superlux seem nearly identical. The Superlux HD-662 series are all closed-back, and they offer good isolation. There are three styles: the 662 (red trim-well balanced), the 662-F (white trim-true bass), and the 662-B (blue trim-bass punch).
The CAD MH310 has white trim, so it's probably the HD-662F. Here I have removed one of the ear cushions to get a better look inside:


Here's a shot someone took of the guts of an AKG (left) and a Superlux (right)...not sure of the exact models used, however:

So it sure looks like the CAD is a rebranded Superlux.
There are a few differences from the original description, once you have the item in front of you: The Superlux is from Taiwan, the CAD box says Made in China. The specs have changed, too - from 10Hz-30KHz to 20Hz-20KHz...darn, I lost some frequency response during shipping! That's perfectly fine with me in this case, because humans generally CAN'T HEAR down to 10Hz (that is bass you feel in your chest at a live show, not something that comes out of 50mm/2-inch drivers) or up to 30KHz.
So it also looks like CAD has put the specs into...perSPECtive. More real-world.
AND my paperwork has the one year warranty upped to a two year warranty. Nice.
***MY REVIEW***
I'm currently "burning-in" a pair right now, I'll be able to comment on those after 100+ hours of burn. My first comments will be on a fresh, unburned set:
These offer pretty good isolation, though not quite as good as some of my vintage cans. Probably thinner-walled plastic in the cups. Might be room for some modding, there (I was thinking that something like fiberglass lining the inside would do some good, I dunno). Comments/suggestions?
They clamp pretty well on my head, around the ears (circumaural), which is a must for tracking, to reduce leakage from the headphone. I am used to this style of headphones, as all of my vintage ones for tracking and my AKG K240-M's for mixing are this type. I like the solid feel of these. Those who aren't used to circumaural headphones may feel a bit claustrophobic in them.
These have a very similar design to the AKG K240's, but the curved metal rods that connect the earpieces (not sure what these are actually called - the headband/s?) are extremely resonant on the CADs...they vibrate/ring at around 80Hz, while the same parts on the AKGs are isolated and do not ring at all. Not that you're going to go around flicking these with your fingernail making them vibrate very often, but it does seem to be a negative as far as using them for a quality reference. If your source material happened to have lots of 80Hz in it, the CAD headphones would probably ring (sympathetic vibration). I will probably add some sort of damping to eliminate the resonance.
Now for the sound quality: VERY NICE. Certainly beyond the price (these list for $99 currently, generally go for about $69, and can be found for as little as $49). I am used to mostly "flat" sound...I use my AKG's for monitoring, so the sound that they output must be as close to the original source material as possible - that's why I chose the AKG's.
The CAD's add a bit of "smile" eq to the source (similar to what a listener might add on their own with a separate equalizer): a bass bump, and some high-end peaks around 6KHz, as shown in this Superlux frequency response chart:

Though I might like to hear a little bit more midrange definition, I must say I really enjoy listening on these headphones! The bass is very full and present, while not being overdone or flabby. The treble is natural and clear, not harsh.
I was able to hear ALL of the test tones 20Hz-20KHz from the Alan Parsons "Sound Check" cd through these headphones, and although the highest and lowest tones were much quieter than the rest, they were most certainly audible.
Please keep in mind that I am only making an assumption that these are rebranded Superlux headphones. I do not have any Superlux HD662-F's yet to make a "for-certain" call. But from the photos and specs online, it seems a safe assumption they are the same...who knows? CAD may have had some alterations done to the Superlux design, to make these their own. Time will tell.
But I must say that I approve of these headphones! Comfortable fit, quality build, nice isolation, and a great listening experience. A GREAT bang-for-the-buck, in my opinion.
2351
Sunday, January 23, 2011
The Orchestra As Sardines

I spent the first weekend of 2011 recording a small orchestra in a small hall. Or rather, HALLWAY. 8^)#
The performance space measured about ten feet wide by fifteen feet high by thirty feet long. The performers numbered eleven: flute, oboe, clarinet, bassoon, french horn, violin, viola, cello, contrabass, drums/percussion, piano. Plus the composer/conducter Mike Przygoda, and the recordist, yours truly.
There were a few six by eight foot practice rooms attached to the main area, and a baby grand piano in an alcove by the entrance.
With a bit of discussion about the (generally poor) room acoustics, and musician-to-conducter sight lines, and what multiple microphones would be likely to introduce in the way of phase cancellation, we decided on the following:
Still shoot for a stereo recording - mono would solve the phase problems, but finding a sweet spot for it would take too long, and anyway, stereo is almost always better...
Percussion items and drumset in a practice room with a single overhead mic (CAD M179 set to cardioid pattern). Piano lid on half-stick with a few winter coats placed over the opening, mic'ed inside with two AT4040's. Maestro Przygoda in the center of the room, conducting directly under the ten-foot tall mic stand (almost against the wall, holding two more CAD M179's, cardioid pattern, two or three feet apart, angled slightly outward). The rest of the musicians spread out across the room in a big arc, all facing the conducter, strings toward the left, woodwinds toward the right.
Recordist in the other practice room.
So here is a quick mix of one of the twenty-four pieces we recorded that weekend.
This is the primary stereo pair with some added reverb, and the unprocessed percussion track added in to the center. No stereo piano tracks added, as there is no piano in this piece.
After listening, I think I could add just a bit more volume on the percussion...what do you think?
Saturday, December 11, 2010
"Dishes" Live At Martyr's

So here's a little example of some live recording - from this past summer's Diana & The Dishes cd-release party at Martyr's in Chicago. The track is titled "If You're Not Mine", and features some groovy banjo work by multi-instrumentalist Mike Przygoda.
This is a "matrix"-ed recording, a mix of the house P.A. (line out) and my binaural recording head Lamont (microphones), time-shifted, equalized, compressed, limited and high-quality mp3'ed for your listening pleasure.
Photo by Bil Gaines
If you happen to enjoy the song, you might want to pick up the album "Take A Picture", HERE or HERE.
Friday, October 22, 2010
WWGJD?

...which of course stands for "What Would Glyn Johns Do?"
Recording the band Rego a few months back, I used the "Glyn Johns method" for recording the drums. I was VERY pleased with the results.
Glyn Johns has worked with such artists as Bob Dylan, The Beatles, The Easybeats, The Band, The Rolling Stones, The Who, The Kinks, Led Zeppelin, Eagles, Eric Clapton, The Clash, The Steve Miller Band, Small Faces, Spooky Tooth, The Ozark Mountain Daredevils, Blue Öyster Cult, Linda Ronstadt, Emmylou Harris, Midnight Oil, New Model Army, Belly, Joe Satriani, Ronnie Lane, Rod Stewart with Faces, Joan Armatrading, Buckacre, Gallagher and Lyle, Georgie Fame, Family, Helen Watson, Fairport Convention and many others. Suffice it to say, THE GUY KNOWS HIS STUFF.
The Glyn Johns method uses only four microphones to cover the entire drumset.
The real backbone to the method is the 2 "overhead" mics: not actually placed overhead in the current mega-mic way, but with the "left side" mic directly over the snare drum facing straight down, and the "right side" mic 6-8 inches above the floor tom, facing the snare and high-hat. These cardioid mics must be equidistant from the center of the snare head. Although I often see people suggesting small-diaphragm condensers for these overheads (and SDC's are a better choice if using them as regular overheads, to pick up primarily cymbals), I don't think that they pick up the *entire* drumset as well as large-diaphragm condensers - so, my pair of AT4040's got used (with the 10db pad engaged). Both forty inches away from the snare (use your tape measure, get them exactly the same distance!). Pan these tracks halfway left and halfway right for a natural stereo balance.
The other 2 mics are just there to reinforce the overheads: a snare mic (I used a Shure BG4.0, SDC, clipped to the top rim, pointed at the center of the snare head, null side toward the high hat) and a kick drum mic (I used a Heil PR40, cardioid dynamic, goes down to 28Hz, 145 SPL, about 6 inches away from the drum, with a surrounding tunnel of a few acoustic foam pads).
No effects on the overheads, some EQ and compression on the snare and kick. Fifteen minutes to set up. Does it get any better than this?
Stephanie Whiton on the drums...sounds a bit like John Bonham to me. Now I've got to find an empty three-story stairwell, so I can get that killer live reverb!
Friday, July 2, 2010
Audio Mythology

Or "SNAKE OIL". Stuff that JUST AIN'T TRUE.
...as far as I know...
****************************************
"Digital-Ready" headphones - they're ALL ready for digital. They always WERE, even before digital. Digital is zero's and one's, which we can't hear. All digital must be converted to analog in order to be heard. All headphones are analog.
**********
Vinyl sounds "better" than cd - Nope, no scratches or motor noise. The recording industry would love us to go back to vinyl, so we could continue to re-purchase music once it had a tiny scratch...but they've been doing pretty well selling us the same music over and over on cd: mastered, remastered, remixed, restored, mono, stereo, surround, SACD...this is why I never bought the Beatles remasters. George Martin did a great job in 1987, there was never any real need to remaster them (besides profiting from a gullible public).
**********
Contact enhancers - Baloney, in fact "Tweek" (from the 1980's) actually CAUSED CORROSION on dissimilar metals.

PLUS, if you're sloppy applying your enhancing goop, you may make an electrical contact where there is supposed to be none: also known as a "SHORT".
**********
Special cd Cleaners:

"Cleaning the cd twice is said to produce best sound" = "Lather, rinse, repeat" = Buy more sooner.
**********
Great bass from small speakers - You need AT LEAST an 8" diameter woofer to reproduce frequencies down to 40Hz. Physics, dude.
**********
Monster Cables - Mega price inflation for Micro electron flow improvement...in fact, after a certain size electron flow DEGRADES.

**********
Headphone response lower than 20hZ - Frequencies below 20Hz can be important when actual speakers are involved, because you FEEL them in your chest...there's no use in paying to get those freqs in your ears!
**********
Ion zappers - static-y cd's...WTF?!?

Of course these make sense for vinyl lp's, static builds up and attracts dust which settles in the grooves (is that why vinyl sounds better?), but for cd's? How soon until they market an mp3 version? Until the warehouse is empty, I guess...
**********
Gold-plated plugs - Generally only gold-colored BRASS plating, which gradually oxidizes and reduces connectivity.
**********
M600 microphone clamp to reduce infrasonic vibrations - infrasound is, by definition, sound below the limit of human hearing. It cannot even be reproduced by regular speakers. This is the "sound" of tectonic plates, deep-flowing magma and cautious elephants, NOT the world of audio recording.

At least the poor economic climate has brought the price of these M600 clamps down below $200 (!).
Sunday, June 6, 2010
Shinybox Ribbon Mic Mod
If you happened to have a pair of Shinybox 23 ribbon microphones set up in front of you, like so:

...would you be able to tell which one had more clarity, a more open tone?
What if the mics were lit from the back, like this:

It seems pretty obvious that the mic on the left, which allows more LIGHT through, would certainly allow more SOUND through. This is accomplished by doing a few simple modifications, which I have photographed, and am putting up here.
First, a few notes about ribbon microphones: they are some of the most delicate and sensitive mics - a cough or a fast breath can rip the 2-micron-thick aluminum ribbon, which ruins the mic. Never blow into a ribbon mic ("Is this thing on? Fff! Fff!"), and always handle with extreme care. Keep them right-side-up or upside-down, NOT horizontal/sideways, as this will cause the ribbon to sag, and not work properly.
These large Shinybox 23 mics are generally the same mics as the Nady RSM-2, the Apex 210, the t.bone RB-500, and the Cascade Vin-Jet, with only very minor differences. The multilayered mesh headbasket can resonate or ring, adding an undesirable metallic haziness to some sources. There are several layers of nylon mesh which are added to avoid wind/breath damage, but they also attenuate the high frequencies, and add phase shift to the low frequencies. And at the front and back of the "motor" (ribbon-and-magnet assembly, the heart of the microphone) are metal "waffle" plates (high frequency resonators), added to provide an acoustical boost in the high end (presumably replacing what the nylon mesh lost), but these parallel plates also create some high frequency comb filtering.
If we promise to be careful with our microphones, we should be able to remove these multiple layers of problematic "help" without any adverse effects.
Here's what we'll need:

That's it? No special tools? No solder? That's right. Piece'o'cake.
Here's a shot of the 1/2" thick foam pieces with a tape measure, for their general size and shape.

What I'm shooting for here, is a full set of step-by-step idiot-proof instructions. Please realize that even though all of my pictures show only ONE hand holding the mic or hand tool, it is because my OTHER hand had to hold a CAMERA. USE BOTH HANDS WHEN DOING THIS MOD. There. Now we're idiot-proof. Not that you're an idiot, but if you were only JUST slightly BARELY considering RIPPING OPEN your ONLY super-delicate ribbon mic, a set of instructions like this might let you go ahead and do it.
SO DO IT.
First, unscrew both knurled round nuts by hand. Remove the 2 small washers. Gently spread open the yoke (the big "Y"-shaped piece), and remove it from the mic.

After moving those parts out of the workspace, use the pliers to loosen the double hex bolts on both sides. I'm calling them "double hex bolts" because they are 2 opposing bolts joined in the middle with a hexagonal head.

Finish removing both double hex bolts by hand, along with the 2 washers.

Move those parts out of your way, then use the screwdriver to loosen the 3 small screws at the base of the headbasket (wire mesh).

Then remove the 3 screws completely.

Move the screws out of the way, then gently lift the headbasket.

Lift it completely off, leaving the microphone assembly sitting inside of the base.

The inside basket is sort of rectangular, covered with fine white nylon mesh. It should simply pull out by hand - wiggle it a bit, watch out for sharp edges.


Discard the rectangular basket and nylon mesh. Then gently lift the motor up out of the base, with the circuit board FACING you. This is the side to work on FIRST.

Use the pliers to loosen the tiny nuts. These have been painted over at the factory to keep them from coming loose, so use the pliers to completely remove them. This is where you have to begin being very careful not to drop any tiny parts! Also, remember to handle the ribbon motor gingerly.

Also remove the tiny little washers...use your fingernail to lift them off the posts. Don't drop them, if you can help it! Generally, if you drop a part, it ends up being trapped in the base (cup), but it could fall through to the ribbon and ruin the mic - CAREFUL!

Move the loose washers and nuts out of the work area. Now ease the motor out of the frame. Gently push the top and bottom bolts out of the black rubber grommets at the top and bottom of the frame. It is a snug fit, just don't force anything or be in a hurry.


Once the assembly is free of the frame, use the pliers to loosen the long cylindrical nuts on both bolts.

Then carefully finish unscrewing them by hand. Also remove the tiny washers.

Now VERY CAREFULLY remove the waffle plate. The layer of nylon should come along with it. Once this is done, the delicate ribbon element will be exposed. No sneezing or coughing or open windows allowed.

The ribbon element:

Now carefully replace the tiny washers and cylindrical nuts. Tighten them to "very snug" (that's tight enough to stay in place well, but not so tight as to strip out the threads) with the pliers. Don't drop anything on the ribbon. Don't slip with the pliers.

Push the bolts back through the rubber grommets in the frame.

Get the 2 tiny washers and hex nuts, and replace them on the bolts, washers go on first. You might need the pliers once you start them by hand, because the leftover paint makes these a snug fit. Tighten to "very snug".

The first side is done. Now turn it over/around to work on the opposite side. Be sure to CUP your hand - don't let the assembly lay flat in your hand, as you need to protect the ribbon from any contact or air movement.

Use the pliers to remove the 2 hex nuts and lift off the 2 tiny washers, the same as the first side.
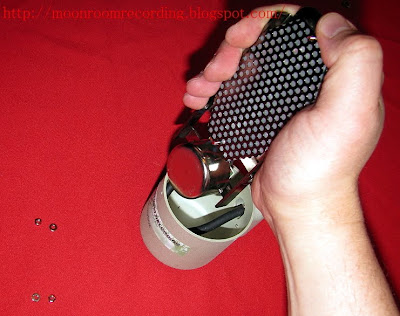
Carefully lift off the waffle plate and nylon mesh.

Replace the washers on the bolts, and then the hex nuts. Use the pliers to tighten them down "very snug".

The completely unobstructed ribbon motor:


Next, sqoosh some foam into the gaps between the motor and the frame at the top and bottom. This should help reduce some mechanical resonances, as the motor virtually pivots on the bolts without this additional support.


Now lift up the mic assembly away from the base, and push in the slotted piece of foam, placing the heavy cable in the slot in the foam.

Carefully replace the assembly into the base, taking care not to detach any wires along the way.

Push/pull with the needle-nose pliers if needed, to help everything sit together nicely. The foam filling the base should reduce or eliminate the resonant frequencies that can build up there. Go ahead and speak with an empty coffee cup next to your mouth to get an idea of the types of "telephone" sounds that can be produced in the base...

Replace the outer mesh headbasket and install the first double hex bolt loosely. There are 1/2" squarish inside plates on either side which should have stayed attached to the frame (that the double hex bolt screws into) - IF you had one fall out during the disassembly, THAT side is the side you should start with: a little tricky, but do-able.

Repeat for the opposite side:

Then tighten both double hex bolts to "very snug" with the pliers.

Then replace the three small screws - just get them started by hand...

Then gently tighten with the screwdriver.

Then replace the yoke on top of the bolts.

Finally add the washers and the round knurled nuts, and tighten to finger tight.

Remember that now you almost ALWAYS have to use a pop filter to protect the ribbon element!

And you must promise to COVER the microphone before moving it to a new spot (yes, evidently even moving the microphone from HERE to THERE creates enough air movement to damage the ribbon)!

Remember that we agreed to be MORE CAREFUL with the microphones after they were modified...
Now go and ENJOY your more open-sounding, slightly brighter, less resonant ribbon microphones...go find a brass band, and record them like crazy!

...would you be able to tell which one had more clarity, a more open tone?
What if the mics were lit from the back, like this:

It seems pretty obvious that the mic on the left, which allows more LIGHT through, would certainly allow more SOUND through. This is accomplished by doing a few simple modifications, which I have photographed, and am putting up here.
First, a few notes about ribbon microphones: they are some of the most delicate and sensitive mics - a cough or a fast breath can rip the 2-micron-thick aluminum ribbon, which ruins the mic. Never blow into a ribbon mic ("Is this thing on? Fff! Fff!"), and always handle with extreme care. Keep them right-side-up or upside-down, NOT horizontal/sideways, as this will cause the ribbon to sag, and not work properly.
These large Shinybox 23 mics are generally the same mics as the Nady RSM-2, the Apex 210, the t.bone RB-500, and the Cascade Vin-Jet, with only very minor differences. The multilayered mesh headbasket can resonate or ring, adding an undesirable metallic haziness to some sources. There are several layers of nylon mesh which are added to avoid wind/breath damage, but they also attenuate the high frequencies, and add phase shift to the low frequencies. And at the front and back of the "motor" (ribbon-and-magnet assembly, the heart of the microphone) are metal "waffle" plates (high frequency resonators), added to provide an acoustical boost in the high end (presumably replacing what the nylon mesh lost), but these parallel plates also create some high frequency comb filtering.
If we promise to be careful with our microphones, we should be able to remove these multiple layers of problematic "help" without any adverse effects.
Here's what we'll need:

That's it? No special tools? No solder? That's right. Piece'o'cake.
Here's a shot of the 1/2" thick foam pieces with a tape measure, for their general size and shape.

What I'm shooting for here, is a full set of step-by-step idiot-proof instructions. Please realize that even though all of my pictures show only ONE hand holding the mic or hand tool, it is because my OTHER hand had to hold a CAMERA. USE BOTH HANDS WHEN DOING THIS MOD. There. Now we're idiot-proof. Not that you're an idiot, but if you were only JUST slightly BARELY considering RIPPING OPEN your ONLY super-delicate ribbon mic, a set of instructions like this might let you go ahead and do it.
SO DO IT.
First, unscrew both knurled round nuts by hand. Remove the 2 small washers. Gently spread open the yoke (the big "Y"-shaped piece), and remove it from the mic.

After moving those parts out of the workspace, use the pliers to loosen the double hex bolts on both sides. I'm calling them "double hex bolts" because they are 2 opposing bolts joined in the middle with a hexagonal head.

Finish removing both double hex bolts by hand, along with the 2 washers.

Move those parts out of your way, then use the screwdriver to loosen the 3 small screws at the base of the headbasket (wire mesh).

Then remove the 3 screws completely.

Move the screws out of the way, then gently lift the headbasket.

Lift it completely off, leaving the microphone assembly sitting inside of the base.

The inside basket is sort of rectangular, covered with fine white nylon mesh. It should simply pull out by hand - wiggle it a bit, watch out for sharp edges.


Discard the rectangular basket and nylon mesh. Then gently lift the motor up out of the base, with the circuit board FACING you. This is the side to work on FIRST.

Use the pliers to loosen the tiny nuts. These have been painted over at the factory to keep them from coming loose, so use the pliers to completely remove them. This is where you have to begin being very careful not to drop any tiny parts! Also, remember to handle the ribbon motor gingerly.

Also remove the tiny little washers...use your fingernail to lift them off the posts. Don't drop them, if you can help it! Generally, if you drop a part, it ends up being trapped in the base (cup), but it could fall through to the ribbon and ruin the mic - CAREFUL!

Move the loose washers and nuts out of the work area. Now ease the motor out of the frame. Gently push the top and bottom bolts out of the black rubber grommets at the top and bottom of the frame. It is a snug fit, just don't force anything or be in a hurry.


Once the assembly is free of the frame, use the pliers to loosen the long cylindrical nuts on both bolts.

Then carefully finish unscrewing them by hand. Also remove the tiny washers.

Now VERY CAREFULLY remove the waffle plate. The layer of nylon should come along with it. Once this is done, the delicate ribbon element will be exposed. No sneezing or coughing or open windows allowed.

The ribbon element:

Now carefully replace the tiny washers and cylindrical nuts. Tighten them to "very snug" (that's tight enough to stay in place well, but not so tight as to strip out the threads) with the pliers. Don't drop anything on the ribbon. Don't slip with the pliers.

Push the bolts back through the rubber grommets in the frame.

Get the 2 tiny washers and hex nuts, and replace them on the bolts, washers go on first. You might need the pliers once you start them by hand, because the leftover paint makes these a snug fit. Tighten to "very snug".

The first side is done. Now turn it over/around to work on the opposite side. Be sure to CUP your hand - don't let the assembly lay flat in your hand, as you need to protect the ribbon from any contact or air movement.

Use the pliers to remove the 2 hex nuts and lift off the 2 tiny washers, the same as the first side.

Carefully lift off the waffle plate and nylon mesh.

Replace the washers on the bolts, and then the hex nuts. Use the pliers to tighten them down "very snug".

The completely unobstructed ribbon motor:


Next, sqoosh some foam into the gaps between the motor and the frame at the top and bottom. This should help reduce some mechanical resonances, as the motor virtually pivots on the bolts without this additional support.


Now lift up the mic assembly away from the base, and push in the slotted piece of foam, placing the heavy cable in the slot in the foam.

Carefully replace the assembly into the base, taking care not to detach any wires along the way.

Push/pull with the needle-nose pliers if needed, to help everything sit together nicely. The foam filling the base should reduce or eliminate the resonant frequencies that can build up there. Go ahead and speak with an empty coffee cup next to your mouth to get an idea of the types of "telephone" sounds that can be produced in the base...

Replace the outer mesh headbasket and install the first double hex bolt loosely. There are 1/2" squarish inside plates on either side which should have stayed attached to the frame (that the double hex bolt screws into) - IF you had one fall out during the disassembly, THAT side is the side you should start with: a little tricky, but do-able.

Repeat for the opposite side:

Then tighten both double hex bolts to "very snug" with the pliers.

Then replace the three small screws - just get them started by hand...

Then gently tighten with the screwdriver.

Then replace the yoke on top of the bolts.

Finally add the washers and the round knurled nuts, and tighten to finger tight.

Remember that now you almost ALWAYS have to use a pop filter to protect the ribbon element!

And you must promise to COVER the microphone before moving it to a new spot (yes, evidently even moving the microphone from HERE to THERE creates enough air movement to damage the ribbon)!

Remember that we agreed to be MORE CAREFUL with the microphones after they were modified...
Now go and ENJOY your more open-sounding, slightly brighter, less resonant ribbon microphones...go find a brass band, and record them like crazy!
Subscribe to:
Posts (Atom)